Search

When you buy items from the Amazon links below, we get a small percentage of the sale. That helps us fund the site. And we like you a lot.

  • The Smitten Kitchen Cookbook
    The Smitten Kitchen Cookbook
    by Deb Perelman
  • Baked Elements: Our 10 Favorite Ingredients
    Baked Elements: Our 10 Favorite Ingredients
    by Matt Lewis, Renato Poliafito
  • Savory Sweet Life: 100 Simply Delicious Recipes for Every Family Occasion
    Savory Sweet Life: 100 Simply Delicious Recipes for Every Family Occasion
    by Alice Currah
  • The Pioneer Woman Cooks: Food from My Frontier
    The Pioneer Woman Cooks: Food from My Frontier
    by Ree Drummond
  • Bouchon Bakery
    Bouchon Bakery
    by Thomas Keller, Sebastien Rouxel

Thursday
May062010

pasta e ceci soup

There are days when children don't sleep.

The oldest isn't quite ready to give up his naps, and the youngest two are nowhere close to that age. There's no figuring out why they didn't sleep. But they didn't.

These are long days.

And today was one of them.

We still have to eat. It's tempting to order sushi (expensive) or slap together a painfully bland pasta and call it a night. Whenever we do that, it feels like we're surviving, and we'll try harder tomorrow.

But then there is soup. This soup. Chop an onion. Crush some garlic. Open a couple of cans of beans and one of tomatoes. Heat. Stir. Wait a bit. Stir. Ready.

This soup is healing and forgiving and reminds you that you did more than just survive today.


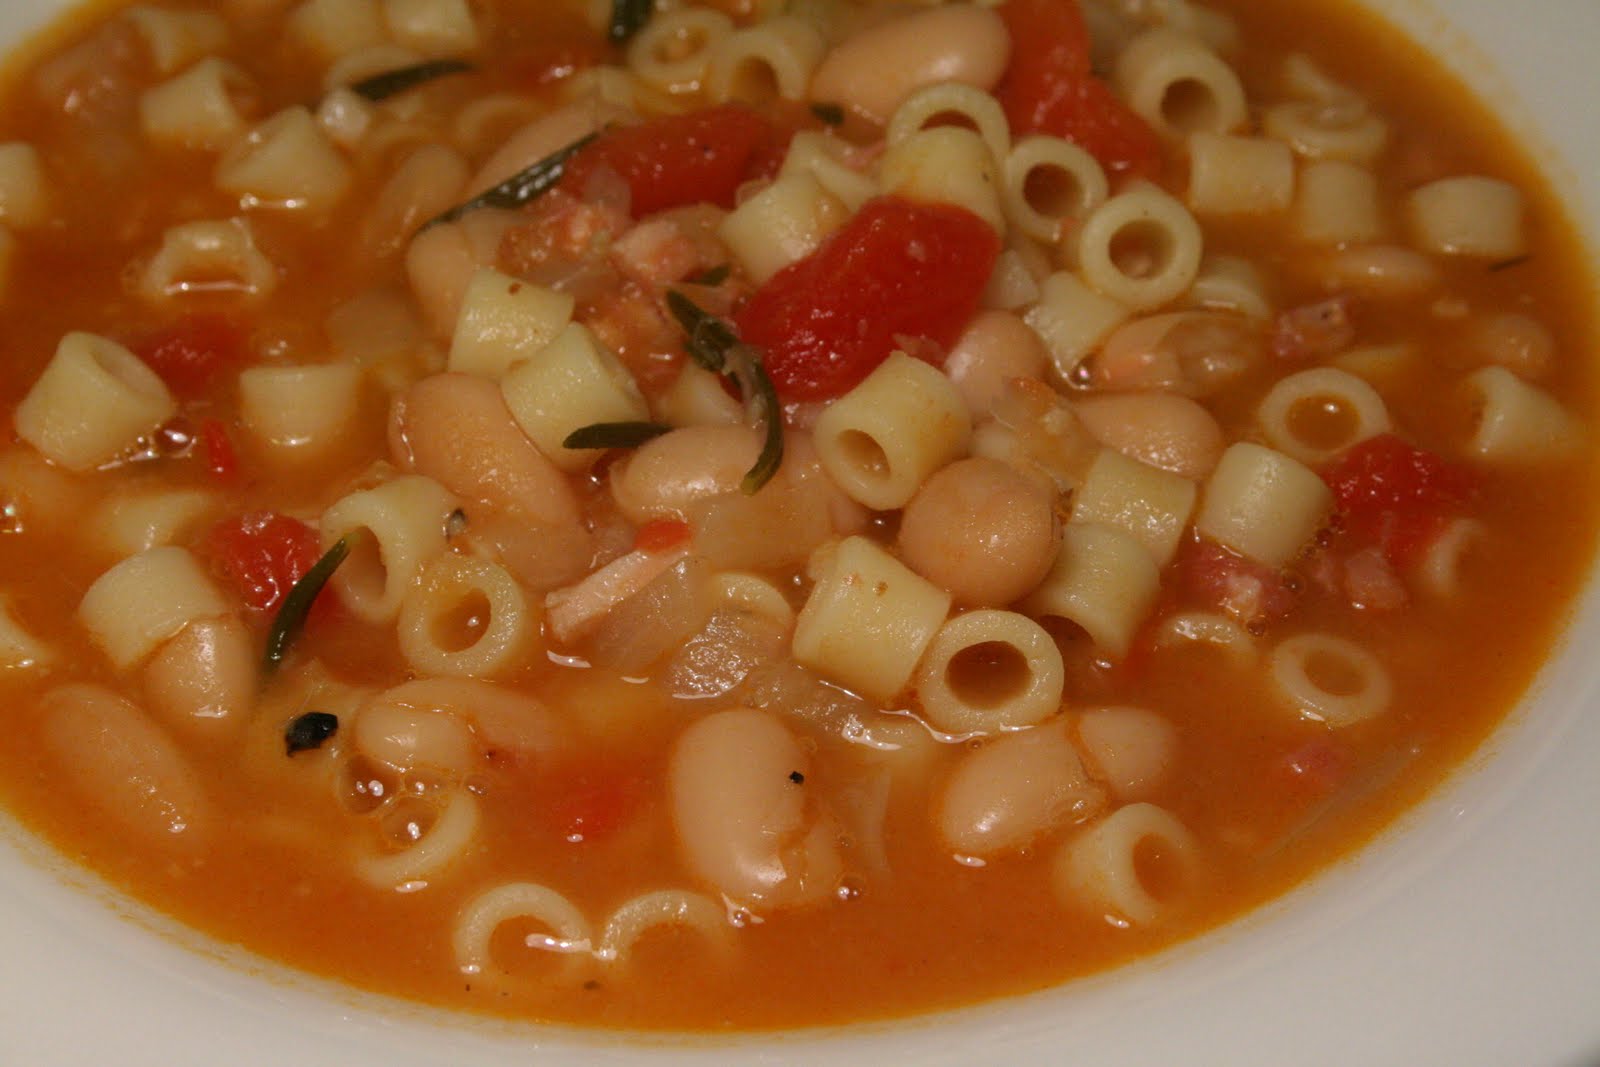
Pasta and beans and some pancetta. Throw in a few herbs to stew. So much flavor for such little effort. Salty, savory. Creamy without a drop of cream (pureed beans make it feel richer than it should). This is a soup when you deserve something better than you have time to make. 

Bookmark this recipe, and when you get to the end of a day when you don't have energy to think or be creative or try hard...make soup.

Note -If you have some truffle oil, use a drizzle here to make the soup even better (tip via Kristen Swenson at Serious Eats). If you don't have truffle oil, you might want to grab a tiny bottle the next time you see it. It's not cheap, but it's an earthy luxury that is worth the spend.

pasta e ceci soup - adapted from Giada De Laurentiis

ingredients


  • 4 fresh thyme sprigs 
  • 1 large fresh rosemary spring 
  • 1 bay leaf 
  • 1 tablespoon olive oil 
  • 1 chopped onion 
  • 3 ounces pancetta, chopped 
  • 3 garlic cloves, minced 
  • 6 cups low-sodium chicken broth 
  • 2 (14.5 ounce) cans garbanzo beans (we use cannellini this time), drained and rinsed 
  • 1 (14.5 ounce) can diced tomatoes, with juice 
  • 3/4 cup ditalini or other small, tubular pasta 
  • 1/2 teaspoon salt 
  • 1/2 teaspoon freshly ground black pepper 
  • 1/3 cup freshly grated Parmesan, for garnish 
  • Extra-virgin olive oil, for drizzling 

Heat the olive oil in a large, heavy saucepan over medium heat. Add the onion, pancetta and garlic and sauté until the onion is tender, about 3 minutes. Add the broth, beans, tomatoes and herbs. Turn up the heat to medium-high and bring to a boil, then decrease the heat to medium and simmer until the vegetables are very tender, about 10 minutes.

Transfer 1 cup of the bean mixture to a blender and reserve (make sure you get plenty of beans). Add the ditalini to the soup pot, cover, and bring the liquid back to a boil. Boil gently until the pasta is tender but still firm to the bite, about 10 minutes (depends on the brand, so check the recommended cooking time). 


Puree the reserved bean mixture until smooth, then stir the puree into the boiling soup. Season with salt and freshly ground black pepper.

Take out the herb stems.

Ladle the soup into bowls. Sprinkle each serving with some Parmesan and drizzle with extra-virgin olive oil or the truffle oil.

Monday
May032010

chicken meatball lasagnettes with creme fraiche bechamel and chicken jus (from Barbara Lynch's Stir)


Let's get this out of the way. This is the best meal we've ever made.

You know when you make something to eat, and you know it's going to be good? But then you taste it, and it blows your mind and taste buds. And your soul?

This recipe is that something. It earned our eternal devotion to Barbara Lynch, the amazing chef and restaurant owner in Boston who is also the author of Stir. It's light, creamy, salty, savory. 

You must make this. And even if you don't make this (which you can count as the greatest mistake in your life), read the recipe, because you can see the way Chef Lynch thinks. This recipe is all about building deep, concentrated flavor. For the jus alone, you're going to cook down sixteen cups of chicken stock into two cups of dark liquid gold.


I've included our changes/shortcuts/modifications. You should buy her cookbook so you can see exactly her approach for yourself. It's a fantastic collection of great food (see her seared scallops with celery root gratinee).


This is a dish of components. This may look overwhelming, but break each element down. It's not a big deal. Make this over a couple of days. Everything keeps perfectly for a day or two or three. You'll have eaten every bite of it by day three.

chicken jus


  • 1 chicken, 7-8# (or whatever you can find) 
  • 1 onion, chopped roughly 
  • 1 carrot, chopped roughly 
  • 1 celery stalk, chopped roughly 
  • 2 garlic cloves, chopped. Roughly if you feel like it. 
  • 2 c dry white wine 
  • 16 cups low-sodium chicken stock (do not use regular chicken stock. You're condensing this down to 2 cups, so you want to control the salt) 
  • 1 T coriander seeds 
  • 1 T black peppercorns 
  • 2 bay leaves 
  • a few fresh thyme sprigs 
  • Kosher salt 
  • Black Pepper 
Preheat your oven to 350F. Get a roasting pan ready or use a cookie sheet covered with foil (easy cleanup).

Cut off all the meat you can from the chicken. I didn't strip ours clean (wing meat, really?). I focused on the breast, thigh, and leg meat. Set the meat in the refrigerator.

Remove all the skin from the chicken. Chop up the bones a bit (you want to expose some marrow), so that you have 8-10 pieces. I chopped off the wing tips because they seemed like they'd burn in the oven.

Throw the chicken on the pan, and get it in the oven. Roast until you get golden pieces (40 minutes was good. Go longer if you want. Or shorter.) See, you're not wasting the meat you didn't pick off -- you're roasting it into deep flavor for the jus.

Throw the bones in a pot. Heat over medium-high. Add in the onions, carrot, celery, and garlic.

Keep stirring them for about 10 minutes.

Add the wine. Reduce it by half.


Add the broth, peppercorns, coriander, bay leaves, and thyme.

Reduce it over a good simmer until reduced to four cups. This may take a couple of hours. You could drink during this time.

Strain the jus through a fine strainer. Mash the broth out of the vegetables. Don't leave any of the flavor behind.


Add the broth to a smaller saucepan. Reduce to 2 cups.


Add the thyme for 2 minutes right before serving.


Season to taste with salt and pepper.


chicken meatballs

  • chicken meat from above
  • 1T vegetable oil
  • 2 shallots, finely chopped. Then chop it more finely.
  • 3 garlic cloves, finely chopped.
  • 1/2 c heavy cream
  • 1 c panko
  • 8 T grated Parm
  • 1 egg, beaten
  • 1 T chopped thyme
  • Kosher salt
  • Black pepper
Heat a pan over medium-low heat. Add the oil. Then the shallot and garlic for 8 minutes. You want them really tender but not browned. Take the pan off the heat.

In a small bowl, add the panko and cream together. Stir. Leave it alone to think about what comes next.


Grind the meat in a food processor until chopped finely. Dump it in a bowl. Add everything left on the list, along with 1 tablespoon of salt and 3/4 teaspoon of pepper. Mix together. Gently add the panko mixture.


Chef Lynch suggests frying a small bit of the meat as a patty in a skillet. Taste for seasoning (we needed more salt).


Heat the oven to 350 F.


Line a baking sheet with foil. Form 3/4 inch meatballs and place on the sheet. Don't let them touch each other. Bake for 8 minutes or so. Ours needed to go for another 90 seconds.


creme fraiche bechamel

  • 4T unsalted butter
  • 1/4 c flour
  • 3/4 c whole milk
  • 1/3 c heavy cream
  • Kosher salt
  • 1/3 c creme fraiche
  • white pepper (yes, you could use black, but it's not the same)
Melt butter over medium heat. Add flour and whisk for 5-8 minutes. It's going to smell nutty, but don't let it get very dark.

Add the milk, cream, and 1 teaspoon of salt. You could cook this for 7 minutes, but ours set up like glue in 2 minutes, and we thinned it out with a bit of milk and cooked it for the rest of the time.


Take it off the heat. Stir in the creme fraiche. Taste it. Season with salt and pepper as needed.


Push the salt a tiny bit, especially if you're afraid of salt.


pasta


  • Flat fresh pasta sheets; make your own (you're so fancy, aren't you?) or buy it like we did (could you use lasagna noodles here? Probably so. Don't let the lack of fresh pasta stop you from making this. But try to find fresh. Try really hard.)
Heat a pot of water to boiling. Salt it.

Cut 4-inch rounds out of the raw pasta. Keep the scraps for another pasta dish.


Cook for 3 minutes. Plunge into an ice bath. Dry each piece.


to assemble the awesome

Heat the oven to 300.

On a baking sheet, place down parchment or a Silpat and spray a tiny bit of vegetable oil on top. This stuff will stick like a mother, and you don't want it to fall apart at the very end.


Lay down a round of pasta. Cover with 1 tablespoon of bechamel. Cover with 3-4 meatballs. Lay down another bit of pasta. Meatballs. Bechamel. Pasta. Meatballs. Bechamel. Pasta. Stack it as high or as low as you want. You could cut the meatballs in half, but don't.


Place a tablespoon of water on the baking pan. It'll steam a bit. Bake for 15 minutes. Maybe a little less.


Use two spatulas to pick up the lasagnettes. Place them in a shallow bowl.


Spoon jus over the top. Spoon some around the base.


Top with some shaved Parm.


Sit down somewhere quiet. Use a big spoon. Get every component in that first bite. Savor. Pay attention to everything that's happening in your mouth.


When all the lasagnette is gone, go ahead and tip the bowl into your mouth. Don't let a bit of the jus go to waste.


Isn't it brilliant?

Monday
Apr262010

falafel burgers with harissa yogurt

I think I stopped feeling like a tourist in NYC when our favorite falafel place when out of business. The loss of hot chickpeas will do that to you.

Karen found the shop when she started working in Midtown East. Then I started working at the same place. Not the falafel place (the would've been awesome)...the same company where Karen worked. My second day there, she insisted we get falafel for lunch. The size of these things was monstrous, like a burrito from Chipotle, shoved full of crispy hot chickpea patties and just enough harissa to make it impossible to stop eating. The place closed down a couple of months later, took a year off, and opened across the street. Then
Crisp (so good) opened up a few doors down and the falafel place closed for good within days. It's the circle of life in the NYC cheap eats scene.

This recipe from Esquire reminds me of the mythological falafel of 3rd Avenue. It uses soaked, uncooked beans which helps it avoid the dreaded mushy center (what's the point? Just eat hummus if you want that). The outside gets ridiculously crispy, almost inappropriately so. And the harissa-spiked Greek yogurt burns while it soothes with lemon, orange, and lime zest. 


For our gluten-free friends, we subbed in soy flour in place of the wheat flour, just to make sure it worked. It worked quite well, and we've noted it in the recipe. Get yourself your favorite g-free bread, and you're set. 


Note - Start soaking the night before you want to serve this. If you forget (like we did), you can start soaking early in the morning for dinner. 

Another note - D
ried fava beans aren't easy to find. I found a bag at the Whole Foods in Columbus Circle, but our local WF didn't have them. They provide a nice bright green flavor, but feel free to go all chickpeas. Plus, chickpeas are cheaper.

falafel burgers with harissa yogurt
 from Dominique Crenn
esquire, november 2009 
(If they had this posted online, we'd link you right to the recipe. But they don't. That's a shame.)

falafel
 
  • 1/2 cup dried chickpeas
  • 1 cup fava beans (or substitute chickpeas for a total of 1.5 cups)
  • 1 minced onion
  • 3 minced garlic cloves
  • 1 bunch chopped parsley
  • 1 t ground cumin
  • 1 t ground coriander
  • 1 t paprika
  • 2 t chopped mint
  • 2 t chopped basil
  • 3 T flour (wheat, chickpea, or soy)
  • 1 t Kosher salt
  • Vegetable oil for frying
Beginning the night before, cover the beans in water. The beans will expand, so cover with an extra two inches of water. No need to refrigerate.

The next day, Drain the beans and throw them into a food processor. Chop finely. Add in the remaining ingredients (not the oil) and give it a spin.


Form the mixture into burger patties, or go with a smaller size to maximize the crisped edges (that's why you're eating these, right?).

Now, make the yogurt. 


harissa yogurt
  • 1 cup Greek yogurt, plain
  • 1.5 T Harissa (could be hard to find. You really need it, so you could always make your own).
  • 1/2 t lime zest (we didn't have any limes, so we used more of the orange and lemon)
  • 1/2 t orange zest
  • 1/2 t lemon zest
  • a squeeze of lemon juice
Dump all ingredients in a bowl. Stir. Nice work, you're done. 

fry the patties

Heat the vegetable oil over medium high. When you get a strong sizzle from a sacrificial bit of falafel, fry the patties on all sides until golden. 

Throw them on to a bread product of your choice (Karen demands
Martin's potato rolls from her hometown). Top with harissa yogurt. And something green and leafy.

You could also serve this over hummus. Or eat them right after you've let them cool for a second. It'll burn, but so worth it.


Pretty close to conjuring the ghost of falafels past.

Tuesday
Apr202010

peanut butter crispy bars

If I had to be honest why I love this recipe, it's because hot sugar scares me.

Most cooking involves a minimum level of danger - open flames, knives that are duller than they should be (making it easier to cut yourself), forgetting I just chopped a habanero and touching my eye.

But hot sugar is kind of terrifying. I had a caramel sauce that foamed up and poured over the pan, burning my hand in the process. That super-saturated sugar water isn't forgiving to skin. 

But much like the Shetland pony that my brothers and I had growing up, which would run full gallop with us riding her without a saddle, only to stop on a dime and send us flying over her head...well, you can't let a few minor disasters in the kitchen stop you from trying to get it right.

So, get the pony ready, 'cuz we're going for a wild ride. It's another dessert from the Baked cookbook (did you get your copy yet?) - essentially a perfect peanut butter cup set on top of a sweet and crunchy foundation of crispy rice cereal. It's going to make you happy. And there's just a little bit of hot sugar involved. You'll be ok.

recipe | peanut butter crispy bars, from the Baked cookbook (buy. it. now.)

For the crispy crust 
1 3/4 cups crisped rice cereal
1/4 cup sugar
3 tablespoons light corn syrup
3 tablespoons unsalted butter, melted


For the milk chocolate peanut butter layer
5 ounces good-quality milk chocolate, coarsely chopped
1 cup creamy peanut butter (I used Skippy brand)
For the chocolate icing
3 ounces dark chocolate (60 to 72 percent cocoa), coarsely chopped
1/2 teaspoon light corn syrup
4 tablespoons unsalted butter


Make the crispy crust
Lightly coat an 8-inch square baking pan with nonstick cooking spray. 

Put the cereal in a large bowl and set aside.


Pour 1/4 cup water into a small saucepan. Gently add the sugar and corn syrup (do not let any sugar or syrup get on the sides of the pan. It will burn easily if you do, and you don't want that) and use a small wooden spoon to stir the mixture until just combined. Put a candy thermometer in the saucepan. Cook over medium-high heat and bring to a boil; cook until the mixture reaches the soft ball stage, 235 degrees F. It took me longer than I expected. Be patient.


Remove from the heat, stir in the butter, and pour the mixture over the cereal. Working quickly, stir until the cereal is thoroughly coated, then pour it into the prepared pan. Using your hands, press the mixture into the bottom of the pan (do not press up the sides). Let the crust cool to room temperature while you make the next layer.


Make the milk chocolate peanut butter layer
In a large nonreactive metal bowl, stir together the chocolate and the peanut butter. Set the bowl over a saucepan of simmering water and cook, stirring with a rubber spatula, until the mixture is smooth. Remove the bowl from the pan and stir for about 30 seconds to cool slightly. Pour the mixture over the cooled crust. Put the pan in the refridgerator for 1 hour, or until the top layer hardens.


Make the chocolate top
In a large nonreactive metal bowl, combine the chocolate, corn syrup, and butter. Set the bowl over a saucepan of simmering water and cook, stirring with a rubber spatula, until the mixture is completely smooth. Remove the bowl from the pan and stir for 30 seconds to cool slightly. Pour the mixture over the chilled milk chocolate peanut butter layer and spread (actually, I found it easier to just roll it around until it coated smoothly, avoiding the risk of picking up any of the peanut butter layer with it) into an even layer. Put the pan into the refrigerator for 1 hour, or until the topping hardens.


Cut into nine-ish squares and serve. The bars can be stored in the refrigerator, covered tightly, for up to four days. But you will want to eat them all at once. Just make another batch tomorrow. No one will know.

Monday
Apr192010

shrimp étouffée (part one)


"I want comfort food."


The kids hadn't taken their naps, a show of unlikely solidarity amongst the three of them. It was a long day for all of us. Karen needed something special for dinner. So when she asked for comfort food, I was assuming garlic mac and cheese and a lot of chocolate for dessert. When I asked her to define "comfort," she surprised me with "Crawfish Étouffée."

So.

Étouffée it is. I've never tasted it before, but it's one of Karen's favorites, so we'll figure it out.

Google tells me I can get crawfish at Dean and Deluca. Too far downtown. Maybe Whole Foods has it in Columbus Circle, but there's no way to walk there, get the crawfish, and make the train before the kids go to bed. We settle quickly on subbing in shrimp. Karen tells me later that the shrimp were great, but crawfish would have tasted even better (fattier, richer). Feel free to use either.


I quickly found two recipes: one from Emeril and one from Paula Deen. I have nothing against either of them, but I was hoping to find some secret recipe to try, something that would unlock the deep mysteries of étouffée. No time for mysteries. The reviews for both recipes were good, so I went with Paula. When in doubt, go with butter.


Once I read the recipe, I figured out the deep mystery -- it's a giant roux with veggies and seafood. Thick, warm goodness. Food that reminds you that you feel full.

I love roux. Fat and flour. Perfect.

I was concerned about using oil instead of butter, but Paula notes in her recipe that butter burns and oil can withstand the long cook time. Some additional search time on Google supported Paula's claim. 26 minutes of oil and flour cooking on the stove. The whole house smelled warm and nutty. Again, perfect.


Paula's recipe calls for a green bell pepper. I don't believe in green bell peppers. I don't think they should exist. They infect everything with their aggressiveness. But red (or yellow or orange) bell peppers are mellow and sweet, with the taste of Spring, so I used red here.


The heat/spiciness is surprising. I love spicy food (at Indian restaurants, I ask them to make it spicy enough to make me cry), and I liked the level of heat, but Karen found it a little too aggressive. Adjust as you see fit. A couple extra/fewer shakes of the Tabasco bottle should help you get it just right.


The amazing thing about the longer cooking times here is that the vegetables maintained some crunchiness. Just a bit, but it was enough.


We served it over Jasmine rice. Any rice would work here. Or none at all.


The whole thing had so many levels going on -- spiciness, crunch, fat, warmth, sea -- we couldn't stop eating it. And I'd defintiely make this recipe again. But we're going to keep searching to unlock some mysteries. Apparently, once you start down the trail of étouffée, you can't stop searching for more.


recipe | shrimp étouffée (from paula deen)

(The next day, I needed a quick lunch. The kids had some leftover mac and cheese. I had some étouffée, minus the shrimp. In a moment of bravery and disgust, I combined them. It was incredible.)